Showing posts with label Reportlab. Show all posts

Wednesday, October 26, 2016

Read from CSV with D, write to PDF with Python

By Vasudev Ram


CSV => PDF

Here is another in my series of applications of xtopdf, my PDF creation toolkit for Python (xtopdf source here).

This xtopdf application is actually a pipeline (nothing Unix-specific though, will work on both *nix and Windows) - a D program reading CSV data and sending it to a Python program, which writes the data to PDF.

The D program, read_csv.d, reads CSV data from a .csv file, and writes it to standard output.

The Python program, StdinToPDF.py (which is part of the xtopdf toolkit), reads its standard input (which is redirected by the pipeline to come from the D program's standard output) and writes the data it reads, to PDF.

Here is the D program, read_csv.d:
/**************************************************
File: read_csv.d
Purpose: A program to read CSV data from a file and 
write it to standard output.
Author: Vasudev Ram
Date created: 2016-10-25
Copyright 2016 Vasudev Ram
Web site: https://vasudevram.github.io
Blog: http://jugad2.blogspot.com
Product store: https://gumroad.com/vasudevram
**************************************************/

import std.algorithm;
import std.array;
import std.csv;
import std.stdio;
import std.file;
import std.typecons;

int main()
{
    try {
        stderr.writeln("Reading CSV data from file.");
        auto file = File("input.csv", "r");
        foreach (record;
            file.byLine.joiner("\n").csvReader!(Tuple!(string, string, int)))
        {
            writefln("%s works as a %s and earns $%d per year",
                     record[0], record[1], record[2]);
        }
    } catch (CSVException csve) {
        stderr.writeln("Caught CSVException: msg = ", csve.msg, 
        " at row, col = ", csve.row, ", ", csve.col);
    } catch (FileException fe) {
        stderr.writeln("Caught FileException: msg = ", fe.msg);
    } catch (Exception e) {
        stderr.writeln("Caught Exception: msg = ", e.msg);
    }
    return 0;
}
The D program is compiled as usual with:
dmd read_csv.d
I ran it first (only the D program) with an invalid CSV file (it has an extra comma at the start on line 3, which invalidates the data by making "Driver" be in the salary column position), and got the expected error message, which includes the row and column number of the place in the CSV file where the program encountered the error - this is useful for fixing the input data:
$ type input.csv
Jack,Carpenter,40000
Tom,Blacksmith,50000
,Jill,Driver,60000
$ read_csv
Reading CSV data from file.
Jack works as a Carpenter and earns $40000 per year
Tom works as a Blacksmith and earns $50000 per year
Caught CSVException: msg = Unexpected 'D' when converting from type string to type int 
at row, col = 3, 3
Then I ran it again, in the regular way, this time with a valid CSV file, and as part of a pipeline, the other pipeline component being StdinToPDF:
$ read_csv | python StdinToPDF.py csv_output.pdf
Reading CSV data from file.
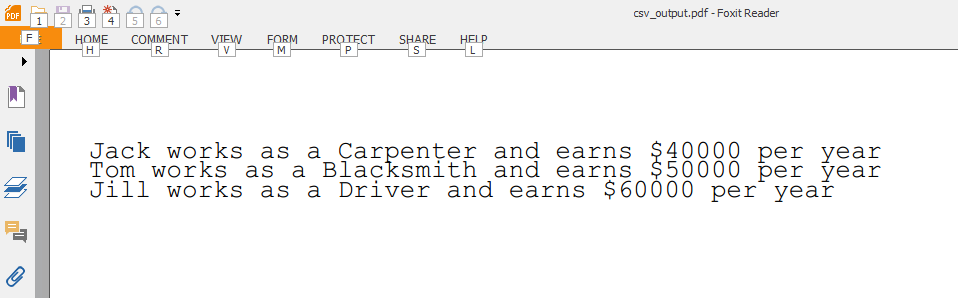
And here is a cropped view of the output as seen in Foxit PDF Reader:


- Enjoy.

- Vasudev Ram - Online Python training and consulting

Get updates on my software products / ebooks / courses.

Jump to posts: Python   DLang   xtopdf

Subscribe to my blog by email

My ActiveState recipes

FlyWheel - Managed WordPress Hosting


Thursday, December 25, 2014

Create tabular PDF reports with Python, xtopdf and tablib

By Vasudev Ram


Tablib is a Python library that allows you to import, export and manipulate tabular data.

I had come across tablib a while ago. Today I thought of using it with xtopdf, my Python library for PDF creation, to generate PDF output from tabular data. So I wrote a program, TablibToPDF.py, for that. It generates dummy data for student grades (for an examination), then puts that data into a tablib Dataset, and then exports the contents of that Dataset to PDF, using xtopdf. Given the comments in the code, it is mostly self-explanatory. I first wrote the program in an obvious/naive way, and then improved it a little by removing some intermediate variables, and by converting some for loops to list comprehensions, thereby shortening the code by a few lines. Here is the code for TablibToPDF.py:
"""
TablibToPDF.py
Author: Vasudev Ram
Copyright 2014 Vasudev Ram - www.dancingbison.com
This program is a demo of how to use the tablib and xtopdf Python libraries 
to generate tabular data reports as PDF output.
Tablib is at: https://tablib.readthedocs.org/en/latest/
xtopdf is at: https://bitbucket.org/vasudevram/xtopdf
and info about xtopdf is at: http://slides.com/vasudevram/xtopdf or 
at: http://slid.es/vasudevram/xtopdf
"""

import random
import tablib
from PDFWriter import PDFWriter

# Helper function to output a string to both screen and PDF.
def print_and_write(pw, strng):
    print strng
    pw.writeLine(strng)

# Set up grade and result names and mappings.
grade_letters = ['F', 'E', 'D', 'C', 'B', 'A']
results = {'A': 'Pass', 'B': 'Pass', 'C': 'Pass', 
    'D': 'Pass', 'E': 'Pass', 'F': 'Fail'}

# Create an empty Dataset and set its headers.
data = tablib.Dataset()
data.headers = ['ID', 'Name', 'Marks', 'Grade', 'Result']
widths = [5, 12, 8, 8, 12] # Display widths for columns.

# Create some rows of student data and use it to populate the Dataset.
# Columns for each student row correspond to the header columns 
# shown above.

for i in range(20):
    id = str(i).zfill(2)
    name = 'Student-' + id
    # Let's grade them on the curve [1].
    # This examiner doesn't give anyone 100 marks :)
    marks = random.randint(40, 99)
    # Compute grade from marks.
    grade = grade_letters[(marks - 40) / 10]
    result = results[grade]
    columns = [id, name, marks, grade, result]
    row = [ str(col).center(widths[idx]) for idx, col in enumerate(columns) ]
    data.append(row)

# Set up the PDFWriter.
pw = PDFWriter('student_grades.pdf')
pw.setFont('Courier', 10)
pw.setHeader('Student Grades Report - generated by xtopdf')
pw.setFooter('xtopdf: http://slides.com/vasudevram/xtopdf')

# Generate header and data rows as strings; output them to screen and PDF.

separator = '-' * sum(widths)
print_and_write(pw, separator)

# Output headers
header_strs = [ header.center(widths[idx]) for idx, header in enumerate(data.headers) ]
print_and_write(pw, ''.join(header_strs))
print_and_write(pw, separator)

# Output data
for row in data:
    print_and_write(pw, ''.join(row))

print_and_write(pw, separator)
pw.close()

# [1] http://en.wikipedia.org/wiki/Grading_on_a_curve
# I'm not endorsing the idea of grading on a curve; I only used it as a 
# simple algorithm to generate the marks and grades for this example.

You can run it with:
$ python TablibToPDF.py
It sends the tabular output that it generates, to both the screen and to a PDF file named student_grades.pdf.
Here is a screenshot of the generated PDF file, opened in Foxit PDF Reader:


The program that I wrote could actually have been written without using tablib, just with plain Python lists and/or dictionaries. But tablib has some additional features, such as dynamic columns, export to various formats (but not PDF), and more - see its documentation, linked near the top of this post. I may write another blog post later that explores the use of some of those tablib features.

- Enjoy.

Vasudev Ram - Python consulting and training - Dancing Bison Enterprises

Signup to hear about new products or services from me.

Contact Page

Saturday, February 15, 2014

Create PDF calendars with xtopdf

By Vasudev Ram


As I keep working on xtopdf, my Python toolkit for PDF creation, every now and then I get ideas for new applications that use xtopdf.

Today I thought of using xtopdf with Python to generate PDF calendars.

Here is a program, CalendarToPDF, which shows how to do that:
"""
CalendarToPDF.py
Author: Vasudev Ram - www.dancingbison.com
Copyright 2014 Vasudev Ram
This is a demo program to generate PDF calendars.
"""

import sys
import traceback
from debug1 import debug1
import calendar
from PDFWriter import PDFWriter

try:
    cal = calendar.TextCalendar(calendar.SUNDAY)
    cal_str = cal.formatmonth(2014, 02, 4, 2)
    cal_lines = cal_str.split("\n")
    pw = PDFWriter("Calendar-February-2014.pdf")
    pw.setFont("Courier", 10)
    pw.setHeader("Calendar for February 2014")
    pw.setFooter("Generated by xtopdf: http://bit.ly/xtopdf")
    for line in cal_lines:
        if line != "":
            pw.writeLine(line)
    pw.close()
    print "Calendar generated."
except Exception as e:
    traceback.print_exc()
    sys.exit(1)

This example program generates a simple PDF text calendar for February 2014. Run it with:

python CalendarToPDF.py

This is a screenshot of the resulting PDF output:


Enjoy.

Read posts about xtopdf on my blog.

- Vasudev Ram - Python training and consulting

Contact Page


Wednesday, October 2, 2013

Convert Microsoft Word files to PDF with DOCXtoPDF


By Vasudev Ram


DOCX to PDF

Building upon my recent post, here:

Extract text from Word .docx files with python-docx,

I came up with the idea of combining that DOCX text extraction functionality of python-docx with my xtopdf toolkit, to create a program that can convert the text in Microsoft Word DOCX files to PDF format.

[ Note: The conversion has some limitations. E.g. fonts, tables, etc. from the input are not preserved in the output. ]

Here is the program, called DOCXtoPDF.py. It will become a part of my xtopdf toolkit.

# DOCXtoPDF.py

# Author: Vasudev Ram - http://www.dancingbison.com
# Copyright 2012 Vasudev Ram, http://www.dancingbison.com

# This is open source code, released under the New BSD License -
# see http://www.opensource.org/licenses/bsd-license.php .

import sys
import os
import os.path
import string
from textwrap import TextWrapper
from docx import opendocx, getdocumenttext
from PDFWriter import PDFWriter

def docx_to_pdf(infilename, outfilename):

    # Extract the text from the DOCX file object infile and write it to 
    # a PDF file.

    try:
        infil = opendocx(infilename)
    except Exception, e:
        print "Error opening infilename"
        print "Exception: " + repr(e) + "\n"
        sys.exit(1)

    paragraphs = getdocumenttext(infil)

    pw = PDFWriter(outfilename)
    pw.setFont("Courier", 12)
    pw.setHeader("DOCXtoPDF - convert text in DOCX file to PDF")
    pw.setFooter("Generated by xtopdf and python-docx")
    wrapper = TextWrapper(width=70, drop_whitespace=False)

    # For Unicode handling.
    new_paragraphs = []
    for paragraph in paragraphs:
        new_paragraphs.append(paragraph.encode("utf-8"))

    for paragraph in new_paragraphs:
        lines = wrapper.wrap(paragraph)
        for line in lines:
            pw.writeLine(line)
        pw.writeLine("")

    pw.savePage()
    pw.close()
    
def usage():

    return "Usage: python DOCXtoPDF.py infile.docx outfile.txt\n"

def main():

    try:
        # Check for correct number of command-line arguments.
        if len(sys.argv) != 3:
            print "Wrong number of arguments"
            print usage()
            sys.exit(1)
        infilename = sys.argv[1]
        outfilename = sys.argv[2]

        # Check for right infilename extension.
        infile_ext = os.path.splitext(infilename)[1]
        if infile_ext.upper() != ".DOCX":
            print "Input filename extension should be .DOCX"
            print usage()
            sys.exit(1)

        # Check for right outfilename extension.
        outfile_ext = os.path.splitext(outfilename)[1]
        if outfile_ext.upper() != ".PDF":
            print "Output filename extension should be .PDF"
            print usage()
            sys.exit(1)

        docx_to_pdf(infilename, outfilename)

    except Exception, e:
        sys.stderr.write("Error: " + repr(e) + "\n")
        sys.exit(1)

if __name__ == '__main__':
    main()

# EOF


To run DOCXtoPDF, give a command of the form:

python DOCXtoPDF.py infilename.docx outfilename.pdf

After this, the text content of the DOCX file will be in the PDF file.

- Enjoy.


Read other posts about xtopdf on this blog.
Read other posts about Python on this blog.

- Vasudev Ram - Dancing Bison Enterprises

Training or consulting inquiry


O'Reilly 50% Ebook Deal of the Day


Monday, September 9, 2013

Publish MongoDB data to PDF with xtopdf


By Vasudev Ram

This program, MongoDBToPDF.py, is a demo of how to publish MongoDB (Wikipedia) data to PDF, using my xtopdf toolkit for PDF creation from other data formats.

mongoDB

To run this program, you need to have Python, Reportlab, xtopdf and MongoDB installed on your system.

Here is the MongoDBToPDF program:

# MongoDBToPDF.py
# Program to publish MongoDB data to PDF using xtopdf.
# Author: Vasudev Ram - http://www.dancingbison.com
# Copyright 2013 Vasudev Ram

from PDFWriter import PDFWriter

import pymongo
from pymongo import MongoClient

# Create a PDFWriter object and set some of its fields.
pw = PDFWriter("MongoDB_data.pdf")
pw.setFont("Courier", 12)
pw.setHeader("MongoDB data to PDF")
pw.setFooter("Generated by xtopdf")

# Connect to MongoDB database.
client = pymongo.MongoClient("localhost", 27017)
db = client.test

# Create a collection.
persons = db.persons

# Add some data to it.
db.persons.save({"Name": "Tom", "Age": 10})
db.persons.save({"Name": "Dick", "Age": 20})
db.persons.save({"Name": "Harry", "Age": 30})

# Loop over the collection and print the items to the screen.
for item in db.persons.find():
    print item["Name"], item["Age"]

# Create an index on the Name field.
db.persons.create_index("Name")

# Loop over the sorted items and print them to PDF.
for item in db.persons.find().sort("Name", pymongo.ASCENDING):
    pw.writeLine(item["Name"] + " | " + str(item["Age"]))

pw.close()

# EOF

Save the above program as MongoDBToPDF.py .

Start the MongoDB server (daemon / service) if it is not already running, with:
mongod

You can now run the program with:
python MongoDBToPDF.py
The output will be in the file MongoDB_data.pdf, which you can view in any suitable PDF viewer, such as Adobe Reader or Foxit PDF Reader.

The above program does the following, broadly speaking:

- creates a PDFWriter instance
- connects to a MongoDB database
- creates a collection and populates it with some person data for the demo
- creates an index on the Name field
- sorts the data on the Name field and prints the data to PDF

According to the Wikipedia article linked above, Craigslist, SAP, Forbes, The New York Times, SourceForge, The Guardian, CERN, Foursquare and eBay are some organizations that use MongoDB.

Read all xtopdf posts on jugad2.

Read all Python posts on jugad2.

- Vasudev Ram - Dancing Bison Enterprises

Contact me


Back to (Tech) School Sale


Wednesday, July 17, 2013

PDFBuilder can now handle unlimited input files


By Vasudev Ram

I had blogged about PDFBuilder a couple of times earlier, here:

PDFBuilder can create composite PDFs

and here:

PDFBuilder can now take multiple input files from command line

I modified PDFBuilder to be able to take the list of input files from a filename specified on the command line with a -f option. So it can now handle an unlimited (*) number of input files.

(*) Well, strictly speaking, still not unlimited, but limited only by the available memory and hard disk space, and by the maximum size of a single file (the output PDF file). But for practical purposes, that can be considered as unlimited.

Here is the updated PDFBuilder program:
# Filename: PDFBuilder.py
# Description: To create composite PDF files containing the content from 
# a variety of input sources, such as CSV files, TDV (Tab Delimited 
# Values) files, XLS files, etc.

# Author: Vasudev Ram - http://www.dancingbison.com
# Copyright 2012 Vasudev Ram, http://www.dancingbison.com

# This is open source code, released under the New BSD License -
# see http://www.opensource.org/licenses/bsd-license.php .

# ------------------------- imports -------------------------

import sys
import os
import os.path
import string
import csv
from  CSVReader import CSVReader
from  TDVReader import TDVReader
from  PDFWriter import PDFWriter

# ------------------------ class PDFBuilder ----------------

class PDFBuilder:
 """
 Class to build a composite PDF out of multiple input sources.
 """

 def __init__(self, pdf_filename, font, font_size, 
    header, footer, input_filenames):
  """
  PDFBuilder __init__ method.
  """
  self._pdf_filename = pdf_filename
  self._input_filenames = input_filenames

  # Create a PDFWriter instance
  self._pw = PDFWriter(pdf_filename)
  debug("PDFBuilder.__init__(): Created PDFWriter instance")

  # Set its font
  self._pw.setFont(font, font_size)

  # Set the header and footer for the PDFWriter instance
  self._pw.setHeader(header)
  self._pw.setFooter(footer)
  
 def build_pdf(self, input_filenames):
  """
  PDFBuilder.build_pdf method.
  Builds the PDF using contents of the given input_filenames.
  """
  for input_filename in input_filenames:
   # Check if name ends in ".csv", ignoring upper/lower case
   if input_filename[-4:].lower() == ".csv":
    reader = CSVReader(input_filename)
    debug("Created a CSVReader from " + input_filename)
   # Check if name ends in ".csv", ignoring upper/lower case
   elif input_filename[-4:].lower() == ".tdv":
    reader = TDVReader(input_filename)
    debug("Created a TDVReader from " + input_filename)
   else:
    sys.stderr.write("Error: Invalid input file. Exiting\n")
    sys.exit(0)

   debug("Reading from %r" % reader.get_description())
   hdr_str = "Data from reader: " + \
    reader.get_description()
   self._pw.writeLine(hdr_str)
   self._pw.writeLine('-' * len(hdr_str))

   reader.open()
   try:
    while True:
     row = reader.next_row()
     debug("row", row)
     s = ""
     for item in row:
      s = s + item + " "
     debug("s", s)
     self._pw.writeLine(s)
   except StopIteration:
    # Close this reader, save this PDF page, and 
    # start a new one for next reader.
    reader.close()
    self._pw.savePage()
    #continue

 def close(self):
  self._pw.close()

# ------------------------- main() --------------------------

def main():

 # global variables

 # program name for error messages
 global prog_name
 # debug flag - if true, print debug messages, else don't
 global DEBUGGING
 
 # Set the debug flag based on environment variable
 debug_env_var = os.getenv("DEBUG")
 if debug_env_var == "1":
  DEBUGGING = True

 sysargv = sys.argv
 lsa = len(sysargv)

 # Save program filename for error messages
 prog_name = sysargv[0]
 debug("Entered " + prog_name + ":main()")

 # check for right args
 debug("lsa =", lsa)
 if lsa < 2:
  usage()
  debug(prog_name + ": Incorrect number of args, exiting.")
  sys.exit(1)

 # Get output PDF filename from the command line.
 pdf_filename = sys.argv[1]
 debug("PDF filename = ", pdf_filename)

 # Check if -f option given
 if sysargv[2] == '-f' and lsa == 4: 
  # If so, read the input filenames from the file given as 
  # sysargv[3] (the input filenames list)
  input_filenames = []
  with open(sysargv[3], "r") as ifl:
   for fn in ifl:
    input_filenames.append(fn.strip('\n'))
 else:
  # Get the input filenames from the command line.
  input_filenames = sys.argv[2:]

 # Create a PDFBuilder instance.
 pdf_builder = PDFBuilder(pdf_filename, "Courier", 10, 
  "Composite PDF", "Composite PDF", input_filenames)

 # Build the PDF using the inputs.
 pdf_builder.build_pdf(input_filenames)

 pdf_builder.close()

 sys.exit(0)

#------------------------- debug ----------------------------

def debug(msg, *args):

 global DEBUGGING
 if not DEBUGGING:
  return
 sys.stderr.write(msg + ": ")
 sys.stderr.write(repr(args) + "\n")

#------------------------- usage ----------------------------

def usage():
 
 global prog_name
 sys.stderr.write("Usage: python " + prog_name + \
  " pdf_filename input_filename(s)\n" + \
  " OR python " + prog_name + " pdf_filename -f input_filename_list\n" + \
  " where input_filename_list is a file containing input filenames\n")

#------------------------- call main ------------------------

if __name__ == "__main__":
 # Set default value for DEBUGGING, override later in main() 
 # based on value of env. var. DEBUG.
 try:
  DEBUGGING = False
  main()
 except Exception, e:
  sys.stderr.write("Caught an exception: " + e)
  sys.exit(1)


#------------------------- EOF: PDFBuilder.py -----------------
You can run it like this:
python PDFBuilder.py PDFBuilder11.pdf -f input_filename_list.txt
where the same input filenames used in the earlier posts, are now stored in the file input_filename_list.txt, one per line (with no leading or trailing spaces).

This will create the composite PDF file PDFBuilder11.pdf, generated from the contents of all those files, as in the earlier posts.

The difference is that in the previous post about PDFBuilder, the input filenames were specified on the command line, which is subject to some limit for length (in earlier UNIX versions it was typically 512 or 1024 bytes, which sometimes led to errors or core dumps, but it has been increased in more recent UNIX and Linux versions).

But this version of PDFBuilder can handle a very large number of input files, since they are not specified on the command line but in another text file, which is given after the -f option in the above command.

I will upload this new PDFBuilder version to the Bitbucket repository for xtopdf shortly.

To read all my posts about xtopdf, you can use this search:

jugad2.blogspot.com/search/label/xtopdf

and similarly, to read all my posts about Python, use this search:

jugad2.blogspot.com/search/label/python

This is a Blogger feature that I got to know about, thanks to Michael Foord.

- Vasudev Ram - Dancing Bison Enterprises

Contact / Hire me
Monday, June 17, 2013

XMLtoPDFBook now supports chapter numbers and names


By Vasudev Ram

I've added support for chapter numbers and names to XMLtoPDFBook, which I blogged about recently. XMLtoPDFBook enables you to create simple PDF ebooks from chapters stored as text in an XML file.

The chapter numbers and names are printed in the header of the PDF file created. Chapter numbers are added automatically, starting from 1, and incremented by 1 for each chapter. For chapter names, you have to change the chapter elements in the XML file from the earlier format, which had no attributes for the chapter element, to add an attribute called 'name', with its value being the chapter name.

Earlier format for the chapter element:

<chapter>

New format for the chapter element:

<chapter name="chapter_name">

where you replace "chapter_name" with the name of each chapter, as desired.

That is the only change needed. The (updated) XMLtoPDFBook program takes care of the rest.

Chapter names, though supported, are optional. If a chapter element has no name attribute, it is not an error. No chapter name will be printed in the header for that chapter.

You can run XMLtoPDFBook the same way as I said in my first post about it:

python XMLtoPDFBook.py vi_quickstart.xml vi_quickstart.pdf

For viewing the PDF file, you may want to try using either Foxit PDF Reader or NitroReader. I've used Foxit Reader a lot, and it is fairly good. Just started trying NitroReader (*).

Here is a screenshot of page 1 of the generated PDF file, vi_quickstart.pdf, in NitroReader (right-click to open in a new tab and view larger size):


And here is a screenshot of page 5 of the same PDF file, vi_quickstart.pdf, in Foxit PDF Reader (right-click to open in a new tab and view larger size):


I also added some more error handling to the program.

I've uploaded XMLtoPDF to my Bitbucket repository for xtopdf, since it is now a part of my xtopdf toolkit. You can download it from here.

Incidentally, I saw on the NitroReader site that it was PDF's birthday this month; the PDF format is now 20 years old.

(*) And finally, it was a bit interesting to me to remember that NitroPDF (from the same company as NitroReader) was one of the topics of my very second blog post on my earlier blog, jugad's Journal :-). I ran that blog for about 3 years before moving to this one (which you are reading now), on Blogger, due to the takeover of LiveJournal by some other company.

- Vasudev Ram - Dancing Bison Enterprises

Contact me

Saturday, June 15, 2013

Create PDF books with XMLtoPDFBook

By Vasudev Ram


XMLtoPDFBook is a program that lets you create simple PDF books from XML text content. It requires Python, ReportLab and my xtopdf toolkit for PDF creation.

(Use ReportLab v1.21, not the 2.x series; though 2.x has more features, xtopdf has not been tested with it; also, those additional features are not required for xtopdf.)

XMLtoPDFBook.py is released as open source software under the BSD license, and I'll be adding it to the tools in my xtopdf toolkit.

Here's how to use XMLtoPDFBook:

In a text editor, create a simple XML template for the book, like this:
<?xml version="1.0"?>
<book>
        <chapter>
        Chapter 1 content here.
        </chapter>

        <chapter>
        Chapter 2 content here.
        </chapter>
</book>
Add as many chapter elements as you need.

Then write or paste the text of one chapter inside each chapter element, in sequence.

Now you can convert the book content to PDF using this program, XMLtoPDFBook:
#--------------------------------------------------
# XMLtoPDFBook.py

# A program to convert a book in XML text format to a PDF book.
# Uses xtopdf and ReportLab.

# Author: Vasudev Ram - http://www.dancingbison.com
# Version: v0.1

#--------------------------------------------------

# imports

import sys
import os
import string
import time

from PDFWriter import PDFWriter

try:
    import xml.etree.cElementTree as ET
except ImportError:
    import xml.etree.ElementTree as ET

#--------------------------------------------------

# global variables

sysargv = None

#--------------------------------------------------

def debug(message):
    sys.stderr.write(message + "\n")

#--------------------------------------------------

def get_xml_filename(sysargv):
    return sysargv[1]

#--------------------------------------------------

def get_pdf_filename(sysargv):
    return sysargv[2]

#--------------------------------------------------

def XMLtoPDFBook():

    debug("Entered XMLtoPDFBook()")

    global sysargv

    xml_filename = get_xml_filename(sysargv)
    debug("xml_filename: " + xml_filename)
    pdf_filename = get_pdf_filename(sysargv)
    debug("pdf_filename: " + pdf_filename)

    pw = PDFWriter(pdf_filename)
    pw.setFont("Courier", 12)
    pw.setHeader(xml_filename + " to " + pdf_filename)
    pw.setFooter("Generated by ElementTree and xtopdf")

    tree = ET.ElementTree(file=xml_filename)
    debug("tree = " + repr(tree))

    root = tree.getroot()
    debug("root.tag = " + root.tag)
    if root.tag != "book":
        debug("Error: Root tag is not 'book'")
        sys.exit(2)

    debug("=" * 60)
    for root_child in root:
        if root_child.tag != "chapter":
            debug("Error: root_child tag is not 'chapter'")
            sys.exit(3)
        debug(root_child.text)
        lines = root_child.text.split("\n")
        for line in lines:
            pw.writeLine(line)
        pw.savePage()
        debug("-" * 60)
    debug("=" * 60)
    pw.close()

    debug("Exiting XMLtoPDFBook()")

#--------------------------------------------------

def main():

    debug("Entered main()")

    global sysargv
    sysargv = sys.argv

    # Check for right number of arguments.
    if len(sysargv) != 3:
        sys.exit(1)

    XMLtoPDFBook()

    debug("Exiting main()")

#--------------------------------------------------

if __name__ == "__main__":
    main()

#--------------------------------------------------

Here is an example run of XMLtoPDFBook, using my vi quickstart article earlier published in Linux For You magazine:

python XMLtoPDFBook.py vi_quickstart.xml vi_quickstart.pdf

This results in the contents of the article being published to PDF in the file vi_quickstart.pdf.

- Vasudev Ram - Dancing Bison Enterprises

Contact me

Sunday, May 26, 2013

Convert multiple text files to PDF with xtopdf

This Python program, batch_text_to_pdf.py, can create a PDF file from a batch of text files.

It uses my xtopdf toolkit, ReportLab and Python.

It also uses the fileinput module from Python's standard library.

The fileinput module is quite useful for creating Unix-style command-line programs in Python, that process a batch of text files, like awk, sed, and other similar Unix tools can.

The basic pattern for these commands is:

command_name file1.txt file2.txt  ...

# batch_text_to_pdf.py

import string
import fileinput
from PDFWriter import PDFWriter

def main():

    # Hard-coded for now,
    # should take PDF name from
    # command line, by skip-
    # ing first name for fileinput.
    pw = PDFWriter('output.pdf')

    pw.setFont('Courier', 12)
    pw.setHeader('Batch text files to PDF')
    pw.setFooter('Created by xtopdf')

    for line in fileinput.input():
        pw.writeLine(line.strip('\n'))

    pw.savePage()
    pw.close()

main()

The program has no error checking and can be improved some (e.g. see the comment in the code); this is just a quick demo.

Run it like this:

python batch_text_to_pdf.py file1.txt  ...

where the  ... means (optionally)  more text file names.

The combined output should then be in file output.pdf.

xtopdf: https://bitbucket.org/vasudevram/xtopdf
ReportLab: http://www.reportlab.com/ftp
Use ReportLab v1.21, not v2.x.

Posted via mobile, sorry for narrow post width.

- Vasudev Ram
dancingbison.com

Wednesday, May 1, 2013

PDF in a Bottle - creating PDF using xtopdf, ReportLab, Bottle and Python

By Vasudev Ram


pdf_bottle.py is a program I wrote that allows you to create a PDF file from text, over the web, by entering your text into a form and submitting it.

Here is the program:
# pdf_bottle.py

# Description: Program to generate PDF from text, over the web,
# using xtopdf, ReportLab and the Bottle web framework.
# It can be used to create short, simple PDF e-books.
# Author: Vasudev Ram - http://dancingbison.com
# Copyright 2013 Vasudev Ram 
# Tested with Python 2.7.

# Version: 0.1

# Dependencies:
# xtopdf - https://bitbucket.org/vasudevram/xtopdf
# bottle - http://bottlepy.org
# ReportLab - http://www.reportlab.com/ftp/reportlab-1.21.zip
# Python - http://python.org

from PDFWriter import PDFWriter

from bottle import route, request, run

@route('/edit_book')
def edit_book():
    return '''
    <form action="/save_book" method="post">
    PDF file name: <input type="text" name="pdf_file_name" />

    Header: <input type="text" name="header" />

    Footer: <input type="text" name="footer" />

    Content:
    <textarea name="content" rows="15"   cols="50"></textarea>

    <input type="submit" value="Submit" />

    </form>
'''

@route('/save_book', method='POST')
def save_book():
    try:
        pdf_file_name = request.forms.get('pdf_file_name')
        header = request.forms.get('header')
        footer = request.forms.get('footer')
        content = request.forms.get('content')

        pw = PDFWriter(pdf_file_name)
        pw.setFont("Courier", 12)
        pw.setHeader(header)
        pw.setFooter(footer)

        lines = content.split('\n')
        for line in lines:
            pw.writeLine(line)

        pw.savePage()
        pw.close()
        return "Done"
    except Exception:
        return "Not done"

def main():
    run(host='localhost', port=9999)

if __name__ == "__main__":
    main()

To run it, you need to have Python, the open source version of ReportLab, my xtopdf toolkit and the Bottle Python web framework installed.

Here is a guide to installing and using xtopdf.

For help with installing the other products, consult their respective sites, linked above.

Then run the program with this command:

python pdf_bottle.py

Then, in a browser window, go to localhost:9999

Enter the details - PDF file name, header, footer and text content - in the form, then click Submit.

The PDF file will be generated in the same directory from where you ran the Python program.

This is the first version, and has been tested only a bit. It you find any issues, please mention them in the comments.

Various improvements are possible, including sending the generated PDF to the user's browser, or providing a link to download it (better), and I'll work on some of them over time.

P.S. Excerpt from the Bottle framework site:

[
Bottle is a fast, simple and lightweight WSGI micro web-framework for Python. It is distributed as a single file module and has no dependencies other than the Python Standard Library.

Routing: Requests to function-call mapping with support for clean and dynamic URLs.
Templates: Fast and pythonic built-in template engine and support for mako, jinja2 and cheetah templates.
Utilities: Convenient access to form data, file uploads, cookies, headers and other HTTP-related metadata.
Server: Built-in HTTP development server and support for paste, fapws3, bjoern, Google App Engine, cherrypy or any other WSGI capable HTTP server.
]

- Vasudev Ram - Dancing Bison Enterprises

Wednesday, April 10, 2013

Using xtopdf and pypyodbc to publish MS Access database data to PDF


By Vasudev Ram

I had blogged about pypyodbc, a pure-Python ODBC library, recently.

Using pypyodbc with my xtopdf toolkit for PDF creation, you can publish your MS Access database data to PDF.

Here is some example code to publish MS Access data to PDF:

First, the program create_ppo_mdb.py, shown below, creates an MS Access database called fruits.mdb, then creates a table called fruits in it, and inserts 3 records into the table:

# create_ppo_mdb.py

import pypyodbc 
             
pypyodbc.win_create_mdb('.\\fruits.mdb')
connection_string = 'Driver={Microsoft Access Driver (*.mdb)};DBQ=.\\fruits.mdb'
connection = pypyodbc.connect(connection_string)

SQL = 'CREATE TABLE fruits (id COUNTER PRIMARY KEY, fruit_name VARCHAR(25));'
connection.cursor().execute(SQL).commit()

SQL = "INSERT INTO fruits values (1, 'apple');"
connection.cursor().execute(SQL).commit()

SQL = "INSERT INTO fruits values (2, 'banana');"
connection.cursor().execute(SQL).commit()

SQL = "INSERT INTO fruits values (3, 'orange');"
connection.cursor().execute(SQL).commit()

# Uncomment the 5 lines below make the program also display the data after creating it.

#SQL = 'SELECT * FROM fruits;'
#cursor = connection.cursor().execute(SQL)
#for row in cursor:
#    for col in row:
#        print col,
#    print

cursor.close()
connection.close()

Next, the program MDBtoPDF.py, shown below, reads the data from the fruits table in the MDB database just created above, and publishes the selected records to PDF:

#-------------------------------------------------------------------

# MDBtoPDF.py
# Description: A program to convert MS Access .MDB data to PDF format.
# Author: Vasudev Ram - http://www.dancingbison.com

#-------------------------------------------------------------------

# imports

import sys 
import os
import time
import string
import pypyodbc 
from PDFWriter import PDFWriter
             
#-------------------------------------------------------------------

# globals

##------------------------ usage ---------------------------------------

def usage():

 sys.stderr.write("Usage: python " + sys.argv[0] + " MDB_DSN table_name pdf_file\n")
 sys.stderr.write("where MDB_DSN is the ODBC DSN (Data Source Name) for the\n")
 sys.stderr.write("MDB file, table_name is the name of the table in that MDB,\n")
 sys.stderr.write("whose data you want to convert to PDF, and pdf_file is the\n")
 sys.stderr.write("output PDF filename.\n")
 sys.stderr.write(sys.argv[0] + " reads the table data from the MDB and\n")
 sys.stderr.write("writes it to pdf_file.\n")

##------------------------ main ------------------------------------------

def main():

 '''Main program to convert MDB data to PDF.
 '''

 # check for right num. of args
 if (len(sys.argv) != 4):
  usage()
  sys.exit(1)

 # extract MDB DSN, table name and pdf filename from args
 mdb_dsn = sys.argv[1]
 table_name = sys.argv[2]
 pdf_fn = sys.argv[3]

 print "mdb_dsn =", mdb_dsn
 print "table_name =", table_name
 print "pdf_fn =", pdf_fn

    # build connection string
 connection_string_prefix = 'Driver={Microsoft Access Driver (*.mdb)};DBQ='
 connection_string = connection_string_prefix + mdb_dsn
 print "connection_string =", connection_string
 connection = pypyodbc.connect(connection_string)
 print "connection =", connection

 # create the PDFWriter instance
 pw = PDFWriter(pdf_fn)

 # and set some of its fields

 # set the font
 pw.setFont("Courier", 10)

 # set the page header
 gen_datetime = time.asctime()
 pw.setHeader("Generated by MDBtoPDF: Input: " + mdb_dsn + \
 " At: " + gen_datetime)

 # set the page footer
 pw.setFooter("Generated by MDBtoPDF: Input: " + mdb_dsn + \
 " At: " + gen_datetime)

 # create the separator for logical grouping of output
 sep = "=" * 60

 # print the data records section title
 pw.writeLine("MDB Data Records from MDB: %s, table: %s" % (mdb_dsn, 
  table_name))

 # print a separator line
 pw.writeLine(sep)

 # read the input MDB data and write it to the PDF file

 SQL = 'SELECT * FROM fruits;'

 cursor = connection.cursor().execute(SQL)
 for row in cursor:
  str_row = ""
  for col in row:
   str_row = str_row + str(col) + " "
  pw.writeLine(str_row)

 # close the cursor and connection
 cursor.close()
 connection.close()

 # print a separator line
 pw.writeLine(sep)

 # save current page
 pw.savePage()

 # close the PDFWriter
 pw.close()

##------------------------ Global code -----------------------------------

# invoke main

if __name__ == '__main__':
 main()

##------------------------ EOF - MDBto_PDF.py ---------------

To make the above programs work, you need to have the Reportlab toolkit v1.21 and the xtopdf toolkit installed, in addition to pypyodbc and Python 2.7. (Click on the "Branches" tab on the xtopdf page linked in the previous sentence to download xtopdf.)

I've had an interest in ODBC ever since I first worked, as team leader, on a middleware software product that used ODBC. The middleware was developed at Infosys Technologies, where I worked at the time.

Though ODBC itself had a good architecture, many driver implementations of the time (this was some years ago) were rather slow, so one of the main goals of the product was to improve the performance of client-server or desktop applications (written in Visual Basic or C) that used ODBC for database access.

I remember learning ODBC as part of the project (and teaching it to the team), and reading most of the book "Inside ODBC" by Kyle Geiger, one of the architects of ODBC - it was a fascinating book, that gave a detailed look inside the architecture of ODBC, the reasons for certain design decisions that were made, and so on.

We succeeded in meeting all the goals of the project, and that middleware product was used in many large client-server applications (using VB and Oracle / Sybase) that were developed by Infosys for its clients. I really had a lot of fun working on that project.

Related links:

ODBC entry on Wikipedia

Inside ODBC - the book, on Amazon

eGenix mxODBC Connect, from eGenix, a German Python products company.

eGenix mxODBC

unixODBC

DataDirect ODBC

iODBC

The Microsoft SQL Server ODBC Driver for Linux - it provides native connectivity from Linux to Microsoft SQL Server. (Seems to be 64-bit only).

- Vasudev Ram - Dancing Bison Enterprises

Wednesday, January 30, 2013

PDFDocument, a ReportLab wrapper

matthiask/pdfdocument · GitHub

Saw it via StackOverflow.

PDFDocument is a wrapper for Reportlab that makes it easier to create PDF documents. Interesting approach.

It  provides methods, such as pdf.h1("A heading"), to generate the HTML-like markup that ReportLab supports. Many HTML-generation tools, including my PySiteCreator tool (which is meant for writing web sites in Python), use a similar approach.

I used a different approach in my xtopdf toolkit, which is also a ReportLab-based library (and also a set of end-user tools), for PDF generation from text, DBF, CSV, TDV/TSV and XLS content. The PDFWriter module/class in xtopdf provides methods like pw.setFont(fontname) and pw.writeLine(text) to create PDF content.

PDFDocument has two templates, for letters and reports, which differ only in the first page. It also has a special template, confidential reports, which uses watermarks.

Related links:

www.reportlab.com

bitbucket.org/vasudevram/PySiteCreator

bitbucket.org/vasudevram/xtopdf

- Vasudev Ram
dancingbison.com

Saturday, November 3, 2012

PDFBuilder can create composite PDFs


By Vasudev Ram

PDFBuilder is a tool to create composite PDFs, i.e. PDFs comprising of data from multiple different input data formats. It is a new component of my xtopdf toolkit for PDF generation.

At present, for input formats, PDFBuilder supports only CSV (Comma Separated Values, which can be exported from / imported to spreadsheets, among other things) and TDV / TSV (Tab Delimited Values / Tab Separated Values), which many UNIX / Linux tools like sed, grep, and awk, can create or process).

But support for more input formats can be added fairly easily, due to the design.

PDFBuilder is included in xtopdf v1.4 (just released on Bitbucket).

To try PDFBuilder:

- Download xtopdf v1.4, then follow the steps in the file README.txt; the steps include installing Python (>= v2.2), if you don't have it already, and Reportlab v1.21. (The steps for installing ReportLab are here.)

Then run this command:
python PDFBuilder.py output.pdf
This will create a composite PDF file, output.pdf, from two CSV files and two TDV files (interleaved). This is hard-coded as of now, but will be changed to take a list of input files from the command-line.

The download includes the 4 input files and the corresponding output PDF file.

Note: The xtopdf links on SourceForge and my site dancingbison.com have not yet been updated for xtopdf v1.4, so don't try to get v1.4 from there, for now.

You can read more about the ReportLab toolkit here.

- Vasudev Ram - Dancing Bison Enterprises

Monday, April 30, 2012

Converting images to PDF with Reportlab and Python


Seen via @ghoseb tweet.

http://css.dzone.com/articles/reportlab-converting-hundreds

Interesting post, including about the memory error with a large number of files; workaround given in post.

I've used the Platypus module of Reportlab a bit; it is powerful. Gives a good amount of control over layout and appearance of the PDF generated. It works at a higher level of abstraction than the core Reportlab pdfgen module, so can save you programming time, as well as mapping more directly to your intentions (what vs. how). And pdfgen is available if you need more low-level control.

- Vasudev Ram
www.dancingbison.com