Showing posts with label Unix-utilities. Show all posts

Monday, April 1, 2019

rmline: Python command-line utility to remove lines from a file [Rosetta Code solution]


- By Vasudev Ram - Online Python training / SQL training / Linux training


Pipeline image attribution

Hi readers,

Long time no post. Sorry.

I saw this programming problem about removing lines from a file on Rosetta Code.

Rosetta Code (Wikipedia) is a programming chrestomathy site.

It's a simple problem, so I thought it would make a good example for Python beginners.

So I wrote a program to solve it. To get the benefits of reuse and composition (at the command line), I wrote it as a Unix-style filter.

Here it is, in file rmline.py:
# Author: Vasudev Ram
# Copyright Vasudev Ram
# Product store:
#    https://gumroad.com/vasudevram
# Training (course outlines and testimonials):
#    https://jugad2.blogspot.com/p/training.html
# Blog:
#    https://jugad2.blogspot.com
# Web site:
#    https://vasudevram.github.io
# Twitter:
#    https://twitter.com/vasudevram

# Problem source:
# https://rosettacode.org/wiki/Remove_lines_from_a_file

from __future__ import print_function
import sys

from error_exit import error_exit

# globals 
sa, lsa = sys.argv, len(sys.argv)

def usage():
    print("Usage: {} start_line num_lines file".format(sa[0]))
    print("Usage: other_command | {} start_line num_lines".format(
    sa[0]))

def main():
    # Check number of args.
    if lsa < 3:
        usage()
        sys.exit(0)

    # Convert number args to ints.
    try:
        start_line = int(sa[1])
        num_lines = int(sa[2])
    except ValueError as ve:
        error_exit("{}: ValueError: {}".format(sa[0], str(ve)))

    # Validate int ranges.
    if start_line < 1:
        error_exit("{}: start_line ({}) must be > 0".format(sa[0], 
        start_line))
    if num_lines < 1:
        error_exit("{}: num_lines ({}) must be > 0".format(sa[0], 
        num_lines))

    # Decide source of input (stdin or file).
    if lsa == 3:
        in_fil = sys.stdin
    else:
        try:
            in_fil = open(sa[3], "r")
        except IOError as ioe:
            error_exit("{}: IOError: {}".format(sa[0], str(ioe)))

    end_line = start_line + num_lines - 1

    # Read input, skip unwanted lines, write others to output.
    for line_num, line in enumerate(in_fil, 1):
        if line_num < start_line:
            sys.stdout.write(line)
        elif line_num > end_line:
            sys.stdout.write(line)

    in_fil.close()

if __name__ == '__main__':
    main()

Here are a few test text files I tried it on:
$ dir f?.txt/b
f0.txt
f5.txt
f20.txt
f0.txt has 0 bytes.
Contents of f5.txt:
$ type f5.txt
line 1
line 2
line 3
line 4
line 5
f20.txt is similar to f5.txt, but with 20 lines.

Here are a few runs of the program, with output:
$ python rmline.py
Usage: rmline.py start_line num_lines file
Usage: other_command | rmline.py start_line num_lines

$ dir | python rmline.py
Usage: rmline.py start_line num_lines file
Usage: other_command | rmline.py start_line num_lines
Both the above runs show that when called with an invalid set of
arguments (none, in this case), it prints a usage message and exits.
$ python rmline.py f0.txt
Usage: rmline.py start_line num_lines file
Usage: other_command | rmline.py start_line num_lines
Same result, except I gave an invalid first (and only) argument, a file name. See the usage() function in the code to know the right order and types of arguments.
$ python rmline.py -3 4 f0.txt
rmline.py: start_line (-3) must be > 0

$ python rmline.py 2 0 f0.txt
rmline.py: num_lines (0) must be > 0
The above two runs shows that it checks for invalid values for the
first two expected integer argyuments, start_line and num_line.
$ python rmline.py 1 2 f0.txt
For an empty input file, as expected, it both removes and prints nothing.
$ python rmline.py 1 2 f5.txt
line 3
line 4
line 5
The above run shows it removing lines 1 through 2 (start_line = 1, num_lines = 2) of the input from the output.
$ python rmline.py 7 4 f5.txt
line 1
line 2
line 3
line 4
line 5
The above run shows that if you give a starting line number larger than the last input line number, it removes no lines of the input.
$ python rmline.py 1 10 f20.txt
line 11
line 12
line 13
line 14
line 15
line 16
line 17
line 18
line 19
line 20
The above run shows it removing the first 10 lines of the input.
$ python rmline.py 6 10 f20.txt
line 1
line 2
line 3
line 4
line 5
line 16
line 17
line 18
line 19
line 20
The above run shows it removing the middle 10 lines of the input.
$ python rmline.py 11 10 f20.txt
line 1
line 2
line 3
line 4
line 5
line 6
line 7
line 8
line 9
line 10
The above run shows it removing the last 10 lines of the input.

Read more:

Pipeline (computing)

Redirection (computing)

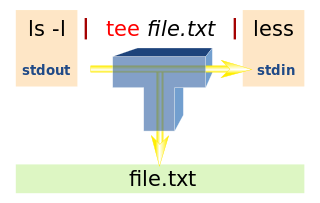
The image at the top of the post is of a Unix-style pipeline, with standard input (stdin), standard output (stdout) and standard error (stderr) streams of programs, all independently redirectable, and with the standard output of a preceding command piped to the standard input of the succeeding command in the pipeline. Pipelines and I/O redirection are one of the powerful features of the Unix operating system and shell.

Read a brief introduction to those concepts in an article I wrote for IBM developerWorks:

Developing a Linux command-line utility

The above link is to a post about that utility on my blog. For the
actual code for the utility (in C), and for the PDF of the article,
follow the relevant links in the post.

I had originally written the utility for production use for one of the
largest motorcycle manufacturers in the world.

Enjoy.


Wednesday, May 10, 2017

Python utility like the Unix cut command - Part 1 - cut1.py

By Vasudev Ram

Regular readers of my blog might have noticed that I sometimes write (and write about) command line utilities in posts here.

Recently, I thought of implementing a utility like the Unix cut command in Python.

Here is my first cut at it (pun intended :), below.

However, instead of just posting the final code and some text describing it, this time, I had the idea of doing something different in a post (or a series of posts).

I thought it might be interesting to show some of the stages of development of the utility, such as incremental versions of it, with features or code improvements added in each successive version, and a bit of discussion on the design and implementation, and also on the thought processes occurring during the work.

(For beginners: incidentally, speaking of thought processes, during interviews for programming jobs at many companies, open-ended questions are often asked, where you have to talk about your thoughts as you work your way through to a solution to a problem posed. I know this because I've been on both sides of that many times. This interviewing technique helps the interviewers gauge your thought processes, and thereby, helps them decide whether they think you are good at design and problem-solving or not, which helps decide whether you get the job or not.)

One reason for doing this format of post, is just because it can be fun (for me to write about, and hopefully for others to read - I know I myself like to read such posts), and another is because one of my lines of business is training (on Python and other areas), and I've found that beginners sometimes have trouble going from a problem or exercise spec to a working implementation, even if they understand well the syntax of the language features needed to implement a solution. This can happen because 1) there can be many possible solutions to a given programming problem, and 2) the way to break down a problem into smaller pieces (stepwise refinement), that are more amenable to translating into programming statements and constructs, is not always self-evident to beginners. It is a skill one acquires over time, as one keeps on programming for months and years.

So I'm going to do it that way (with more explanation and multiple versions), over the course of a few posts.

For this first post, I'll just describe the rudimentary first version that I implemented, and show the code and the output of a few runs of the program.

The Wikipedia link about Unix cut near the top of this post describes its behavior and command line options.

In this first version, I only implement a subset of those:
- reading from a file (only a single file, and not reading from standard input (stdin))
- only support the -c (for cut by column) option (not the -b (by byte) or -f (by field) options)
- only support one column specification, i.e. -cm-n, not forms like -cm1-n1,m2-n2,...

In subsequent versions, I'll add support for some of the omitted features, and also fix any errors that I find in previous versions, by testing.

I'll call the versions cutN.py, where 1 <= N <= the highest version I implement. So this current post is about cut1.py.

Here is the code for cut1.py:
"""
File: cut1.py
Purpose: A Python tool somewhat similar to the Unix cut command.
Does not try to be exactly the same or implement all the features 
of Unix cut. Created for educational purposes.
Author: Vasudev Ram
Copyright 2017 Vasudev Ram
Web site: https://vasudevram.github.io
Blog: https://jugad2.blogspot.com
Product store: https://gumroad.com/vasudevram
"""

from __future__ import print_function

import sys
from error_exit import error_exit

def usage(args):
    #"Cuts the specified columns from each line of the input.\n", 
    lines = [
    "Print only the specified columns from lines of the input.\n", 
    "Usage: {} -cm-n file\n".format(args[0]), 
    "or: cmd_generating_text | {} -cm-n\n".format(args[0]), 
    "where -c means cut by column and\n", 
    "m-n means select (character) columns m to n\n", 
    "For each line, the selected columns will be\n", 
    "written to standard output. Columns start at 1.\n", 
    ]
    for line in lines:
        sys.stderr.write(line)

def cut(in_fil, start_col, end_col):
    for lin in in_fil:
        print(lin[start_col:end_col])

def main():

    sa, lsa = sys.argv, len(sys.argv)
    # Support only one input file for now.
    # Later extend to support stdin or more than one file.
    if lsa != 3:
        usage(sa)
        sys.exit(1)

    prog_name = sa[0]

    # If first two chars of first arg after script name are not "-c",
    # exit with error.
    if sa[1][:2] != "-c":
        usage(sa)
        error_exit("{}: Expected -c option".format(prog_name))

    # Get the part of first arg after the "-c".
    c_opt_arg = sa[1][2:]
    # Split that on "-".
    c_opt_flds = c_opt_arg.split("-")
    if len(c_opt_flds) != 2:
        error_exit("{}: Expected two field numbers after -c option, like m-n".format(prog_name))

    try:
        start_col = int(c_opt_flds[0])
        end_col = int(c_opt_flds[1])
    except ValueError as ve:
        error_exit("Conversion of either start_col or end_col to int failed".format(
        prog_name))

    if start_col < 1:
        error_exit("Error: start_col ({}) < 1".format(start_col))
    if end_col < 1:
        error_exit("Error: end_col ({}) < 1".format(end_col))
    if end_col < start_col:
        error_exit("Error: end_col < start_col")
    
    try:
        in_fil = open(sa[2], "r")
        cut(in_fil, start_col - 1, end_col)
        in_fil.close()
    except IOError as ioe:
        error_exit("Caught IOError: {}".format(repr(ioe)))

if __name__ == '__main__':
    main()
Here are the outputs of a few runs of cut1.py. I used this text file for the tests.
The line of digits at the top acts like a ruler :) which helps you know what character is at what column:
$ type cut-test-file-01.txt
12345678901234567890123456789012345678901234567890
this is a line with many words in it. how is it.
here is another line which also has many words.
now there is a third line that has some words.
can you believe it, a fourth line exists here.
$ python cut1.py
Print only the specified columns from lines of the input.
Usage: cut1.py -cm-n file
or: cmd_generating_text | cut1.py -cm-n
where -c means cut by column and
m-n means select (character) columns m to n
For each line, the selected columns will be
written to standard output. Columns start at 1.

$ python cut1.py -c
Print only the specified columns from lines of the input.
Usage: cut1.py -cm-n file
or: cmd_generating_text | cut1.py -cm-n
where -c means cut by column and
m-n means select (character) columns m to n
For each line, the selected columns will be
written to standard output. Columns start at 1.

$ python cut1.py -c a
cut1.py: Expected two field numbers after -c option, like m-n

$ python cut1.py -c0-0
Print only the specified columns from lines of the input.
Usage: cut1.py -cm-n file
or: cmd_generating_text | cut1.py -cm-n
where -c means cut by column and
m-n means select (character) columns m to n
For each line, the selected columns will be
written to standard output. Columns start at 1.

$ python cut1.py -c0-0 a
Error: start_col (0) < 1

$ python cut1.py -c1-0 a
Error: end_col (0) < 1

$ python cut1.py -c1-1 a
Caught IOError: IOError(2, 'No such file or directory')

$ python cut1.py -c1-1 cut-test-file-01.txt
1
t
h
n
c

$ python cut1.py -c6-12 cut-test-file-01.txt
6789012
is a li
is anot
here is
ou beli

$ python cut1.py -20-12 cut-test-file-01.txt
Print only the specified columns from lines of the input.
Usage: cut1.py -cm-n file
or: cmd_generating_text | cut1.py -cm-n
where -c means cut by column and
m-n means select (character) columns m to n
For each line, the selected columns will be
written to standard output. Columns start at 1.
cut1.py: Expected -c option

$ python cut1.py -c20-12 cut-test-file-01.txt
Error: end_col < start_col
- Vasudev Ram - Online Python training and consulting

Get updates (via Gumroad) on my forthcoming apps and content.

Jump to posts: Python * DLang * xtopdf

Subscribe to my blog by email

My ActiveState Code recipes

Follow me on: LinkedIn * Twitter

Are you a blogger with some traffic? Get Convertkit:

Email marketing for professional bloggers


Friday, March 31, 2017

A Python class like the Unix tee command


By Vasudev Ram


Tee image attribution

Hi readers,

A few days ago, while doing some work with Python and Unix (which I do a lot of), I got the idea of trying to implement something like the Unix tee command, but within Python code - i.e., not as a Python program but as a small Python class that Python programmers could use to get tee-like functionality in their code.

Today I wrote the class and a test program and tried it out. Here is the code, in file tee.py:
# tee.py
# Purpose: A Python class with a write() method which, when 
# used instead of print() or sys.stdout.write(), for writing 
# output, will cause output to go to both sys.stdout and 
# the filename passed to the class's constructor. The output 
# file is called the teefile in the below comments and code.

# The idea is to do something roughly like the Unix tee command, 
# but from within Python code, using this class in your program.

# The teefile will be overwritten if it exists.

# The class also has a writeln() method which is a convenience 
# method that adds a newline at the end of each string it writes, 
# so that the user does not have to.

# Python's string formatting language is supported (without any 
# effort needed in this class), since Python's strings support it, 
# not the print method.

# Author: Vasudev Ram
# Web site: https://vasudevram.github.io
# Blog: https://jugad2.blogspot.com
# Product store: https://gumroad.com/vasudevram

from __future__ import print_function
import sys
from error_exit import error_exit

class Tee(object):
    def __init__(self, tee_filename):
        try:
            self.tee_fil = open(tee_filename, "w")
        except IOError as ioe:
            error_exit("Caught IOError: {}".format(repr(ioe)))
        except Exception as e:
            error_exit("Caught Exception: {}".format(repr(e)))

    def write(self, s):
        sys.stdout.write(s)
        self.tee_fil.write(s)

    def writeln(self, s):
        self.write(s + '\n')

    def close(self):
        try:
            self.tee_fil.close()
        except IOError as ioe:
            error_exit("Caught IOError: {}".format(repr(ioe)))
        except Exception as e:
            error_exit("Caught Exception: {}".format(repr(e)))

def main():
    if len(sys.argv) != 2:
        error_exit("Usage: python {} teefile".format(sys.argv[0]))
    tee = Tee(sys.argv[1])
    tee.write("This is a test of the Tee Python class.\n")
    tee.writeln("It is inspired by the Unix tee command,")
    tee.write("which can send output to both a file and stdout.\n")
    i = 1
    s = "apple"
    tee.writeln("This line has interpolated values like {} and '{}'.".format(i, s))
    tee.close()

if __name__ == '__main__':
    main()
And when I ran it, I got this output:
$ python tee.py test_tee.out
This is a test of the Tee Python class.
It is inspired by the Unix tee command,
which can send output to both a file and stdout.
This line has interpolated values like 1 and 'apple'.

$ type test_tee.out
This is a test of the Tee Python class.
It is inspired by the Unix tee command,
which can send output to both a file and stdout.
This line has interpolated values like 1 and 'apple'.

$ python tee.py test_tee.out > main.out

$ fc /l main.out test_tee.out
Comparing files main.out and TEST_TEE.OUT
FC: no differences encountered
As you can see, I compared the teefile with the redirected stdout output, and they are the same.

I have not implemented the exact same features as the Unix tee. E.g. I did not implement the -a option (to append to a teefile if it exists, instead of overwriting it), and did not implement the option of multiple teefiles. Both are straightforward.

Ideas for the use of this Tee class and programs using it:

- the obvious one - use it like the Unix tee, to both make a copy of some program's output in a file, and show the same output on the screen. We could even pipe the screen (i.e. stdout) output to a Python (or other) text file pager :-)

- to capture intermediate output of some of the commands in a pipeline, before the later commands change it. For another way of doing that, see:

Using PipeController to run a pipe incrementally

- use it to make multiple copies of a file, by implementing the Unix tee command's multiple output file option in the Tee class.

Then we can even use it like this, so we don't get any screen output, and also copy some data to multiple files in a single step:

program_using_tee_class.py >/dev/null # or >NUL if on Windows.

Assuming that multiple teefiles were specified when creating the Tee object that the program will use, this will cause multiple copies of the program's output to be made in different specified teefiles, while the screen output will be thrown away. IOW, it will act like a command to copy some data (the output of the Python program) to multiple locations at the same time, e.g. one could be on a directory on your hard disk, another could be on a USB thumb/pen drive, a third could be on a network share, etc. The advantage here is that by copying from the source only once, to multiple destinations, we avoid reading or generating data multiple times, one for the copy to each destination. This can be more efficient, particularly for large outputs / copies.

For more fun Unixy / Pythonic stdin / stdout / pipe stuff, check out:

[xtopdf] PDFWriter can create PDF from standard input

and a follow-up post, that shows how to use the StdinToPDF program in that post, along with my selpg Unix C utility, to print only selected pages of text to PDF:

Print selected text pages to PDF with Python, selpg and xtopdf on Linux

Enjoy your tea :)

- Vasudev Ram - Online Python training and consulting

Get updates (via Gumroad) on my forthcoming apps and content.

Jump to posts: Python * DLang * xtopdf

Subscribe to my blog by email

My ActiveState Code recipes

Follow me on: LinkedIn * Twitter

Are you a blogger with some traffic? Get Convertkit:

Email marketing for professional bloggers


Saturday, March 4, 2017

m, a Unix shell utility to save cleaned-up man pages as text

By Vasudev Ram


mu image attribution

I was using this Unix utility called m today, as I often do, when working on Linux. It's a shell script that lets you save the man pages for one or more Unix commands, system calls or other topics, to text files, after cleaning up the man command output to remove formatting meant for emphasis, printing, etc.

I had first written m a while ago, on Unix boxes that I used to work on earlier, as opposed to Linux, which I use these days.
At that time it was needed, because on some Unix versions, man page output used to be formatted for printers (by text-processing tools such as nroff and troff. These tools would insert extra formatting characters in the output, for effects like bold and underscore, that made it less easy to read the text file on screen, if you simply redirected it to a file, and opened it in a text editor. (Reading the page via the man command itself would work fine.)

Here is the m script, shown by cat [1]:
cat ~/bin/m
cat displays:
mkdir -p ~/man
for i
do
    man $i | col -bx > ~/man/$i.m
done
[1] Check out "useless use of cat" at the cat link above.

(A less-known fact is that "for i" is shorthand for "for i in $*", i.e. it iterates over all the command-line arguments to the script. Not to be confused with "for i in *" which will iterate over all the filenames in the current directory, because the * expands to that.)

m uses the convention of putting all the text files that it creates (one per command-line argument), into a directory called man, under your home directory, i.e. ~/man. If the directory does not exist, it will be created.

You have to save the above script as a file called m in a directory that is in your Unix PATH. Creating a directory called ~/bin is a good choice - your local bin directory:
mkdir ~/bin
cp m ~/bin  # Assumes you created m in your current directory.
and make it executable using chmod:
chmod u+x ~/man/m
Now if I run m as follows, to generate (as cleaned-up text) the man pages for, say, the fopen and fclose C stdio library functions,
m fopen fclose
it creates the text files fopen.m and fclose.m in my ~/man directory.
I can then open fopen.m with the view command (vi in read-only mode):
view ~/man/fopen.m
Here is a screenshot of the file opened in vi(ew):


Enjoy.

P.S. If you are new to vi and want to get up and running with it fast, check out my vi quickstart tutorial. I first wrote it for a couple of friends, Windows system administrator colleagues of mine, who had been given additional charge of a few Unix boxes, at their request, to help them to get up to speed with vi. They later said it helped with that.

P.P.S. If you like short words and commands like m, check out the Japanese word mu for some interesting points.

A few excerpts:
[
The Japanese and Korean term mu (Japanese: 無; Korean: 무) or Chinese wú (traditional Chinese: 無; simplified Chinese: 无) meaning "not have; without" is a key word in Buddhism, especially Zen traditions.
...
Some English translation equivalents of wú or mu 無 are:
"no", "not", "nothing", or "without"[2]
nothing, not, nothingness, un-, is not, has not, not any[3]
[1] Nonexistence; nonbeing; not having; a lack of, without. [2] A negative. [3] Caused to be nonexistent. [4] Impossible; lacking reason or cause. [5] Pure human awareness, prior to experience or knowledge. This meaning is used especially by the Chan school.
...
The character wu 無 originally meant "dance" and was later used as a graphic loan for wu "not". The earliest graphs for 無 pictured a person with outstretched arms holding something (possibly sleeves, tassels, ornaments) and represented the word wu "dance; dancer".
...
The Gateless Gate, which is a 13th-century collection of Chan or Zen kōans, uses the word wu or mu in its title (Wumenguan or Mumonkan 無門關) and first kōan case ("Joshu's Dog" 趙州狗子). Chinese Chan calls the word mu 無 "the gate to enlightenment".[9] The Japanese Rinzai school classifies the Mu Kōan as hosshin 発心 "resolve to attain enlightenment", that is, appropriate for beginners seeking kenshō "to see the Buddha-nature"'.[10]
...
In the original text, the question is used as a conventional beginning to a question-and-answer exchange (mondo). The reference is to the Mahāyāna Mahāparinirvāṇa Sūtra[14] which says for example:
In this light, the undisclosed store of the Tathagata is proclaimed: "All beings have the Buddha-Nature".[15]
...
In Robert M. Pirsig's 1974 novel Zen and the Art of Motorcycle Maintenance, mu is translated as "no thing", saying that it meant "unask the question". He offered the example of a computer circuit using the binary numeral system, in effect using mu to represent high impedance:
...
"Mu" may be used similarly to "N/A" or "not applicable," a term often used to indicate the question cannot be answered because the conditions of the question do not match the reality.
...
Because of this meaning, programming language Perl 6 uses "Mu" for the root of its type hierarchy.[23]
]

The image at the top of the post, is the character mu in seal script.

P.P.P.S. Really the last this time :) Another m-word:

Check out Muji - simplicity is deceptively complex.

Enjoy.

- Vasudev Ram - Online Python training and consulting

Get updates (via Gumroad) on my forthcoming apps and content.

Jump to posts: Python * DLang * xtopdf

Subscribe to my blog by email

My ActiveState Code recipes

Follow me on: LinkedIn * Twitter

Managed WordPress Hosting by FlyWheel


Sunday, January 8, 2017

An Unix seq-like utility in Python

By Vasudev Ram


Due to a chain (or sequence - pun intended :) of thoughts, I got the idea of writing a simple version of the Unix seq utility (command-line) in Python. (Some Unix versions have a similar command called jot.)

Note: I wrote this program just for fun. As the seq Wikipedia page says, modern versions of bash can do the work of seq. But this program may still be useful on Windows - not sure if the CMD shell has seq-like functionality or not. PowerShell probably has it, is my guess.)

The seq command lets you specify one or two or three numbers as command-line arguments (some of which are optional): the start, stop and step values, and it outputs all numbers in that range and with that step between them (default step is 1). I have not tried to exactly emulate seq, instead I've written my own version. One difference is that mine does not support the step argument (so it can only be 1), at least in this version. That can be added later. Another is that I print the numbers with spaces in between them, not newlines. Another is that I don't support floating-point numbers in this version (again, can be added).

The seq command has more uses than the above description might suggest (in fact, it is mainly used for other things than just printing a sequence of numbers - after all, who would have a need to do that much). Here is one example, on Unix (from the Wikipedia article about seq):
# Remove file1 through file17:
for n in `seq 17`
do
    rm file$n
done
Note that those are backquotes or grave accents around seq 17 in the above code snippet. It uses sh / bash syntax, so requires one of them, or a compatible shell.

Here is the code for seq1.py:
'''
seq1.py
Purpose: To act somewhat like the Unix seq command.
Author: Vasudev Ram
Copyright 2017 Vasudev Ram
Web site: https://vasudevram.github.io
Blog: https://jugad2.blogspot.com
Product store: https://gumroad.com/vasudevram
'''

import sys

def main():
    sa, lsa = sys.argv, len(sys.argv)
    if lsa < 2:
        sys.exit(1)
    try:
        start = 1
        if lsa == 2:
            end = int(sa[1])
        elif lsa == 3:
            start = int(sa[1])
            end = int(sa[2])
        else: # lsa > 3
            sys.exit(1)
    except ValueError as ve:
        sys.exit(1)

    for num in xrange(start, end + 1):
        print num, 
    sys.exit(0)
    
if __name__ == '__main__':
    main()
And here are a few runs of seq1.py, and the output of each run, below:
$ py -2 seq1.py

$ py -2 seq1.py 1
1

$ py -2 seq1.py 2
1 2

$ py -2 seq1.py 3
1 2 3

$ py -2 seq1.py 1 1
1

$ py -2 seq1.py 1 2
1 2

$ py -2 seq1.py 1 3
1 2 3

$ py -2 seq1.py 4
1 2 3 4

$ py -2 seq1.py 1 4
1 2 3 4

$ py -2 seq1.py 2 2
2

$ py -2 seq1.py 5 3

$ py -2 seq1.py -6 -2
-6 -5 -4 -3 -2

$ py -2 seq1.py -4 -0
-4 -3 -2 -1 0

$ py -2 seq1.py -5 5
-5 -4 -3 -2 -1 0 1 2 3 4 5

There are many other possible uses for seq, if one uses one's imagination, such as rapidly generating various filenames or directory names, with numbers in them (as a prefix, suffix or in the middle), for testing or other purposes, etc.

- Enjoy.

- Vasudev Ram - Online Python training and consulting

Get updates (via Gumroad) on my forthcoming apps and content.

Jump to posts: Python * DLang * xtopdf

Subscribe to my blog by email

My ActiveState Code recipes

Follow me on: LinkedIn * Twitter

Managed WordPress Hosting by FlyWheel


Thursday, April 7, 2016

bsplit - binary file split utility in Python

By Vasudev Ram

Some days ago I had written a post about a Unix-like file split utility that I wrote in Python:

Unix split command in Python

I mentioned that unlike the Unix split, I had written mine to only work on text files, because it might be preferable to do it that way (the "do one thing well" idea). I had also said I could write the binary file split as a separate tool. Here it is - bsplit.py:

import sys

import os OUTFIL_PREFIX = "out_" def error_exit(message, code=1): sys.stderr.write("Error:\n{}".format(str(message))) sys.exit(code) def err_write(message): sys.stderr.write(message) def make_out_filename(prefix, idx): '''Make a filename with a serial number suffix.''' return prefix + str(idx).zfill(4) def bsplit(in_filename, bytes_per_file): '''Split the input file in_filename into output files of bytes_per_file bytes each. Last file may have less bytes.''' in_fil = open(in_filename, "rb") outfil_idx = 1 out_filename = make_out_filename(OUTFIL_PREFIX, outfil_idx) out_fil = open(out_filename, "wb") byte_count = tot_byte_count = file_count = 0 c = in_fil.read(1) # Loop over the input and split it into multiple files # of bytes_per_file bytes each (except possibly for the # last file, which may have less bytes. while c != '': byte_count += 1 out_fil.write(c) # Bump vars; change to next output file. if byte_count >= bytes_per_file: tot_byte_count += byte_count byte_count = 0 file_count += 1 out_fil.close() outfil_idx += 1 out_filename = make_out_filename(OUTFIL_PREFIX, outfil_idx) out_fil = open(out_filename, "wb") c = in_fil.read(1) # Clean up. in_fil.close() if not out_fil.closed: out_fil.close() if byte_count == 0: os.remove(out_filename) def usage(): err_write( "Usage: [ python ] {} in_filename bytes_per_file\n".format( sys.argv[0])) err_write( "splits in_filename into files with bytes_per_file bytes\n".format( sys.argv[0])) def main(): if len(sys.argv) != 3: usage() sys.exit(1) try: # Do some checks on arguments. in_filename = sys.argv[1] if not os.path.exists(in_filename): error_exit( "Input file '{}' not found.\n".format(in_filename)) if os.path.getsize(in_filename) == 0: error_exit( "Input file '{}' has no data.\n".format(in_filename)) bytes_per_file = int(sys.argv[2]) if bytes_per_file <= 0: error_exit( "bytes_per_file cannot be less than or equal to 0.\n") # If all checks pass, split the file. bsplit(in_filename, bytes_per_file) except ValueError as ve: error_exit(str(ve)) except IOError as ioe: error_exit(str(ioe)) except Exception as e: error_exit(str(e)) if __name__ == '__main__': main()

The program takes two command line arguments: - the name of an input file to split - the number of bytes per file, into which to split the input file

I tested bsplit with various combinations of test input files and bytes_per_file values. It worked as expected. But if you find any issues, I'd be interested to know - please leave a comment.

Some other recent posts related to the split / bsplit utilities:

A basic file compare utility in Python

Python one-liner to compare two files (conditions apply)

- Enjoy.

- Vasudev Ram - Online Python training and programming

Signup to hear about new products and services I create.

Posts about Python  Posts about xtopdf

My ActiveState recipes

Saturday, March 26, 2016

A basic file compare utility in Python

By Vasudev Ram


Weighing dishes from the island of Thera, Minoan civilization, 2000–1500 BC

Image attribution: Norbert Nagel

Recently, I had written a simple version of the Unix split command in Python. In order to check whether a split command works correctly, you have to join the files it creates - the split files - back into a single file, and then compare that new file to the original input file. So you need a file comparison utility. While both Unix and Windows have such utilities (cmp and fc.exe respectively), I thought of writing a simple one in Python. I did that, and then tested it with a few pairs of input files.

Here is the code, in file_compare.py:
# file_compare.py
# A simple file comparison utility.
# Author: Vasudev Ram
# Copyright 2016 Vasudev Ram

import sys
import os
from os.path import exists, getsize

def out_write(msg):
    sys.stdout.write(msg)

def err_write(msg):
    sys.stderr.write(msg)

def usage():
    err_write("Usage: {} file_a file_b\n".format(sys.argv[0]))

def file_object_compare(in_fil_a, in_fil_b):
    '''Logic: Assume files are equal to start with.
    Read both files, character by character.
    Compare characters at corresponding byte offsets. 
    If any pair at the same offset don't match, the files 
    are unequal. If we reach the end of the files, and 
    there was no mismatch, the files are equal.  We do not
    check for one file being a strict subset of the other, 
    because we only enter this function if the files are 
    of the same size.'''

    files_are_equal = True
    pos = 0
    while True:
        ca = in_fil_a.read(1)
        if ca == '':
            break
        cb = in_fil_b.read(1)
        if cb == '':
            break
        if ca != cb:
            files_are_equal = False
            break
        pos += 1
        if pos % 10000 == 0:
            print pos, 

    if files_are_equal:
        return (True, None)
    else:
        return (False, "files differ at byte offset {}".format(pos))

def file_compare(in_filename_a, in_filename_b):
    '''Compare the files in_filename_a and in_filename_b.
    If their contents are the same, return (True, None).
    else return (False, "[reason]"), where [reason] 
    is the reason why they are different, as a string.
    Reasons could be: file sizes differ or file contents differ.'''

    if getsize(in_filename_a) != getsize(in_filename_b):
        return (False, "file sizes differ")
    else:
        in_fil_a = open(in_filename_a, "rb")
        in_fil_b = open(in_filename_b, "rb")
        result = file_object_compare(in_fil_a, in_fil_b)
        in_fil_a.close()
        in_fil_b.close()
        return result
        
def main():
    if len(sys.argv) != 3:
        usage()
        sys.exit(1)

    try:
        # Get the input filenames.
        in_filename_a, in_filename_b = sys.argv[1:3]
        # Check they exist.
        for in_filename in (in_filename_a, in_filename_b):
            if not exists(in_filename):
                err_write(
                    "Error: Input file '{}' not found.\n".format(in_filename))
                sys.exit(1)
        # Don't allow comparing a file with itself.
        if in_filename_a == in_filename_b:
            out_write("No sense comparing {} against itself.".format(in_filename_a))
            sys.exit(0)
        # Compare the files.
        result = file_compare(in_filename_a, in_filename_b)
        if result[0]:
            out_write("Files compare equal.")
        else:
            out_write("Files compare unequal: {}".format(result[1]))
        sys.exit(0)
    except IOError as ioe:
        sys.stderr.write("Caught IOError: {}\n".format(str(ioe)))
    except Exception as e:
        sys.stderr.write("Caught Exception: {}\n".format(str(e)))

if __name__ == '__main__':
    main()
And here are a few input files I ran it with (containing differences at progressive character positions), a few runs of the program, and the output of those runs:
$ type f0.txt
file 1

$ type f1.txt
file 1

$ type f2.txt
file 2

$ type f3.txt
file 3

$ type f4.txt
mile 1

$ type f5.txt
fale 1

$ type f6.txt
fire 1

$ python file_compare.py
Usage: file_compare.py file_a file_b

$ python file_compare.py a b
Error: Input file 'a' not found.

$ python file_compare.py f0.txt f1.txt
Files compare equal.

$ python file_compare.py f0.txt f2.txt
Files compare unequal: files differ at byte offset 5

$ python file_compare.py f1.txt f2.txt
Files compare unequal: files differ at byte offset 5

$ python file_compare.py f2.txt f2.txt
No sense comparing f2.txt against itself.

$ python file_compare.py f1.txt f3.txt
Files compare unequal: files differ at byte offset 5

$ python file_compare.py f1.txt f4.txt
Files compare unequal: files differ at byte offset 0

$ python file_compare.py f1.txt f5.txt
Files compare unequal: files differ at byte offset 1

$ python file_compare.py f1.txt f6.txt
Files compare unequal: files differ at byte offset 2

$ python file_compare.py f1.txt f7.txt
Error: Input file 'f7.txt' not found.

$ python file_compare.py f64MB f64MB2
Files compare equal.
Most of the files tested were small, but I also tested with some files of tens of lines, and the last pair of files tested was 64 MB each.

Note:

These two lines:
if pos % 10000 == 0:
            print pos, 
are present in order to display a progress counter, for comparisons on large files. You can delete them if you don't want to monitor the progress of the comparison.

Currently I am using read(1), which means Python is reading the file character by character. There are potentially many levels of buffering that happen anyway, such as at the level of the C stdio library that underlies CPython's I/O, the OS, the hard disk controller, and even the CPU. But it may be possible to improve the performance of this program, by specifying some buffer when opening the files.

See:

Python open function
and
Default buffer size for a file

It's possible to write a much shorter version of this program, subject to certain limitations :-) Can you guess how? If you have an idea, mention it in the comments.

The image at the top is of weighing dishes from the island of Thera, Minoan civilization, 2000–1500 BC.

- Enjoy.

- Vasudev Ram - Online Python training and programming

Signup to hear about new products and services I create.

Posts about Python  Posts about xtopdf

My ActiveState recipes

Tuesday, March 15, 2016

Unix split command in Python

By Vasudev Ram

Recently, there was an HN thread about the implementation (not just use) of text editors. Someone mentioned that some editors, including vim, have problems opening large files. Various people gave workarounds or solutions, including using vim and other ways.

I commented that you can use the Unix command bfs (for big file scanner), if you have it on your system, to open the file read-only and then move around in it, like you can in an editor.

I also said that the Unix commands split and csplit can be used to split a large file into smaller chunks, edit the chunks as needed, and then combine the chunks back into a single file using the cat commmand.

This made me think of writing, just for fun, a simple version [1] of the split command in Python. So I did that, and then tested it some [2]. Seems to be working okay so far.

[1] I have not implemented the full functionality of the POSIX split command, only a subset, for now. May enhance it with a few command-line options, or more functionality, later, e.g. with the ability to split binary files. I've also not implemented the default size of 1000 lines, or the ability to take input from standard input if no filename is specfied. (Both are easy.)

However, I am not sure whether the binary file splitting feature should be a part of split, or should be a separate command, considering the Unix philosophy of doing one thing and doing it well. Binary file splitting seems like it should be a separate task from text file splitting. Maybe it is a matter of opinion.

[2] I tested split.py with various valid and invalid values for the lines_per_file argument (such as -3, -2, -1, 0, 1, 2, 3, 10, 50, 100) on each of these input files:

in_file_0_lines.txt
in_file_1_line.txt
in_file_2_lines.txt
in_file_3_lines.txt
in_file_10_lines.txt
in_file_100_lines.txt

where the meaning of the filenames should be self-explanatory.

Of course, I also checked after each test run, that the output file(s) contained the right data.

(There may still be some bugs, of course. If you find any, I'd appreciate hearing about it.)

Here is the code for split.py:

import sys
import os

OUTFIL_PREFIX = "out_"

def make_out_filename(prefix, idx):
    '''Make a filename with a serial number suffix.'''
    return prefix + str(idx).zfill(4)

def split(in_filename, lines_per_file):
    '''Split the input file in_filename into output files of 
    lines_per_file lines each. Last file may have less lines.'''
    in_fil = open(in_filename, "r")
    outfil_idx = 1
    out_filename = make_out_filename(OUTFIL_PREFIX, outfil_idx)
    out_fil = open(out_filename, "w")
    # Using chain assignment feature of Python.
    line_count = tot_line_count = file_count = 0
    # Loop over the input and split it into multiple files.
    # A text file is an iterable sequence, from Python 2.2,
    # so the for line below works.
    for lin in in_fil:
        # Bump vars; change to next output file.
        if line_count >= lines_per_file:
            tot_line_count += line_count
            line_count = 0
            file_count += 1
            out_fil.close()
            outfil_idx += 1
            out_filename = make_out_filename(OUTFIL_PREFIX, outfil_idx)
            out_fil = open(out_filename, "w")
        line_count += 1
        out_fil.write(lin)
    in_fil.close()
    out_fil.close()
    sys.stderr.write("Output is in file(s) with prefix {}\n".format(OUTFIL_PREFIX))
        
def usage():
    sys.stderr.write(
    "Usage: {} in_filename lines_per_file\n".format(sys.argv[0]))

def main():

    if len(sys.argv) != 3:
        usage()
        sys.exit(1)

    try:
        # Get and validate in_filename.
        in_filename = sys.argv[1]
        # If input file does not exist, exit.
        if not os.path.exists(in_filename):
            sys.stderr.write("Error: Input file '{}' not found.\n".format(in_filename))
            sys.exit(1)
        # If input is empty, exit.
        if os.path.getsize(in_filename) == 0:
            sys.stderr.write("Error: Input file '{}' has no data.\n".format(in_filename))
            sys.exit(1)
        # Get and validate lines_per_file.
        lines_per_file = int(sys.argv[2])
        if lines_per_file <= 0:
            sys.stderr.write("Error: lines_per_file cannot be less than or equal to 0.\n")
            sys.exit(1)
        # If all checks pass, split the file.
        split(in_filename, lines_per_file) 
    except ValueError as ve:
        sys.stderr.write("Caught ValueError: {}\n".format(repr(ve)))
    except IOError as ioe:
        sys.stderr.write("Caught IOError: {}\n".format(repr(ioe)))
    except Exception as e:
        sys.stderr.write("Caught Exception: {}\n".format(repr(e)))
        raise

if __name__ == '__main__':
    main()
You can run split.py like this:
$ python split.py
Usage: split.py in_filename lines_per_file
which will give you the usage help. And like this to actually split text files, in this case, a 100-line text file into 10 files of 10 lines each:
$ python split.py in_file_100_lines.txt 10
Output is in file(s) with prefix out_
Here are a couple of runs with invalid values for either the input file or the lines_per_file argument:
$ python split.py in_file_100_lines.txt 0
Error: lines_per_file cannot be less than or equal to 0.

$ python split.py not-there.txt 0
Error: Input file 'not-there.txt' not found.
As an aside, thinking about whether to use 0 or 1 as initial value for some of the _count variables in the program, made me remember this topic:

Why programmers count from 0

See the first few hits for some good answers.

And finally, speaking of zero, check out this earlier post by me:

Bhaskaracharya and the man who found zero

- Enjoy.

- Vasudev Ram - Online Python training and programming

Signup to hear about new products and services I create.

Posts about Python  Posts about xtopdf

My ActiveState recipes

Monday, November 24, 2014

youtube-dl, Python video download tool, on front page of Hacker News


By Vasudev Ram


youtube-dl is a video download tool written in Python.

I had blogged about youtube-dl a while ago, here:

youtube-dl, a YouTube downloader in Python [1]

and again some days later, here:

How to download PyCon US 2013 videos for offline viewing using youtube-dl

(The comments on the above post give some better / easier ways to download the videos than I gave in the post.)

Today I saw that a Hacker News thread about youtube-dl was on the front page of Hacker News for at least part of the day (up to the time of writing this). The thread is here:

youtube-dl (on Hacker News)

I scanned the thread and saw many comments saying that the tool is good, what different users are using it for, many advanced tips on how to use it, etc. The original creator of youtube-dl, Ricardo Garcia, as well as a top contributor and the current maintainer (Filippo Valsorda and Philipp Hagemeister, respectively) also participated in the HN thread, as HN users rg3, FiloSottile and phihag_, respectively. I got to know from the thread that youtube-dl has many contributors, and that its source code is updated quite frequently (for changes in video site formats and other issues), both points which I did not know earlier. (I did know that you can use it to update itself, using the -U option).

Overall, the HN thread is a worthwhile read, IMO, for people interested in downloading videos for offline viewing. The thread had over 130 comments at the time of writing this post.

(On a personal note, since I first got to know about youtube-dl and downloaded it, I've been using it a fair amount to download videos every now and then, for offline viewing, and it has worked pretty well. There were only a few times when it gave an error saying the video could not be downloaded, and I am not sure whether it was due to a problem with the tool, or with the video site.)

[1] My first post about youtube-dl also had a brief overview of its code, which may be of interest to some Pythonistas.

This other post which mentions youtube-dl may also be of interest:

The most-watched Python repositories on Github

since youtube-dl was one of those most-watched repositories, at the time of writing that post.

- Vasudev Ram - Dancing Bison Enterprises

Signup for emails about new products from me.

Contact me for Python consulting and training.

Friday, October 24, 2014

Print selected text pages to PDF with Python, selpg and xtopdf on Linux

By Vasudev Ram


In a recent blog post, titled My IBM developerWorks article, I talked about a tutorial that I had written for IBM developerWorks a while ago. The tutorial showed some of the recommended techniques and practices to follow when writing a Linux command-line utility that is intended for production use, and how to write it in such a way that it can easily cooperate with existing UNIX command-line tools, when used in a UNIX command pipeline.

This ability of properly written command-line tools to cooperate with each other when used in a pipeline, is, as I said in that IBM article, one of the keys to the power of Linux (and UNIX) as a development environment. (See the classic book The UNIX Programming Environment, for much more on this topic.)

The utility I wrote and discussed (in that IBM article), called selpg (for SELect PaGes), allows the user to select a specified range of pages from a text file. At the end of the aforementioned blog post, I had said that I would show some practical uses of the selpg utility later. I describe one such use case below, involving a combination of selpg and my xtopdf toolkit), which is a Python library for PDF creation.

(The xtopdf toolkit contains a PDF creation library, and also includes some sample applications that show how to use the library to create PDF output in various ways, and from various input sources, which is why I tend to call xtopdf a toolkit instead of just a library.

I had written one such application of xtopdf a while ago, called StdinToPDF(.py) (for standard input to PDF). I blogged about it at the time, here:

[xtopdf] PDFWriter can create PDF from standard input. (PDFWriter is a module of xtopdf, which provides the core PDF creation functionality.)

The selpg utility can be used with StdinToPDF, in a pipeline, to select a range of pages (by starting and ending page numbers) from a (possibly large) text file, and write only those selected pages to a PDF file. Here is an example of how to do that:

First, build the selpg utility from source, for your Linux OS. selpg is only meant to work on Linux, since it uses some Linux C standard library functions, such as from stdio.h, and popen(); but you can try to run it on Windows (at your own risk), since Windows does have (had?) a POSIX subsystem, from Windows NT onward. I have used it in the past. (Update: I checked - according to this section of the Wikipedia article about POSIX, Windows may have had POSIX support only from Windows NT up to Windows 2000.) Anyway, to build selpg on Linux, follow the steps below (the $ sign is the shell prompt and not to be typed):

1. Download the source code from the sources section of the selpg project repository on Bitbucket.

Download all of these files: makefile, mk, selpg.c and showsyserr.c .

2. Make the (shell script) file mk executable, with the command:
$ chmod u+x mk
3. Then run the file mk, with:
$ ./mk
That will run the makefile that builds the selpg executable using the C compiler on your Linux box. The C compiler (invoked as cc or gcc) is installed on most mainstream Linux distributions. If it is not, you will need to install it from the repository for your Linux distribution. Sometimes only a minimal version of a C compiler is installed, which is only enough to (re)compile the kernel after making kernel parameter changes, such as for performance tuning. Consult your local Linux expert for help if such is the case.

3. Now make the file selpg executable, with the command:
$ chmod u+x selpg
4. (Optional) You can check the usage of selpg by reading the IBM tutorial article and/or running selpg without any command-line arguments:
$ ./selpg
which will show a usage message.

6. (Optional) You can run selpg a few times with some text file(s) as input, and different values for the -s and -e command-line options, to get a feel for how it works.

Now download xtopdf (which includes StdinToPDF) from here:

xtopdf on Bitbucket.

To install it, follow the steps given in this post:

Guide to installing and using xtopdf, including creating simple PDF e-books

That post was written a while ago, when xtopdf was hosted on SourceForge. So you need to make one change to the instructions given in that guide: instead of downloading xtopdf from SourceForge, as stated in Step 5 of the guide, get it from the xtopdf Bitbucket link I gave above.

(To make xtopdf work, you also have to install ReportLab, which xtopdf depends uses internally; the steps for that are given in my xtopdf installation guide linked above, or you can also look at the instructions in the ReportLab distribution. It is easy, just a couple of steps - download, unzip, configure a setting or two.)

Once you have both selpg and xtopdf installed, you can use selpg and StdinToPDF together. Here is an example run, to select only pages 2 through 4 from an input text file:

I wrote a simple Python program, gen_selpg_test_file,py, to create a text file that can be used to test the selpg and StdinToPDf programs together.

Here is an excerpt of the core logic of gen_selpg_test_file.py, omitting argument and error handling for brevity (I have those in the actual code):

# Generate the test file with the given filename and number of lines of text.
    try:
        out_fil = open(out_filename, "w")
    except IOError as ioe:
        sys.stderr.write("Error: Could not open output file {}.\n".format(out_filename))
        sys.exit(1)
    for line_num in range(1, num_lines + 1):
        line = "Line #" + str(line_num).zfill(10) + "\n"
        out_fil.write(line)
    out_fil.close()
I ran it like this:
$ python gen_selpg_test_file.py selpg_test_file_1000.txt 1000
to generate a text file with 1000 lines, in the file selpg_test_file_1000.txt .

Then I could run the pipeline using selpg and StdinToPDF, as described above:
$ ./selpg -s2 -e4 selpg_test_file_1000.txt | python StdinToPDF.py p2-p4.pdf
This command extracts only the specifed pages (2 to 4) from the input file, and pipes them to StdinToPDF, which converts those pages only, to PDF, in the filename specified at the end of the command.

After doing the above, you can open the file p2_p4.pdf in your favorite PDF reader (Evince is one PDF reader for Linux), to confirm that it contains all (and only) the lines from page 2 to 4 of the input file selpg_test_file_1000.txt (considering 72 lines per page, which is the default that selpg uses).

Read the IBM article to see how that default can be changed - to either another number of lines per page, e.g. 66 or 80 or whatever, or to specify form feeds (ASCII code 12) as the page delimiter. Form feeds are often used as a page delimiter in text file reports generated by programs, when the reports are destined for a printer, since the form feed character causes the printer to advance the print head to the top of the next page/form (that's how the character got its name).

Though this post seemed long, note that a lot it was either background information or instructions on how to build selpg and install xtopdf. Those are both one time jobs. Once those are done, you can select the needed pages from any text file and print them to PDF with a single command-line, as shown in the last command above.

This is useful when you printed the entire file earlier, and some pages didn't print properly because the printer jammed. Just use selpg with xtopdf to print only the needed pages again.


The image above is from the Wikipedia article on Printing, and titled:

Jikji, "Selected Teachings of Buddhist Sages and Son Masters" from Korea, the earliest known book printed with movable metal type, 1377. Bibliothèque Nationale de France, Paris

- Enjoy.

- Vasudev Ram - Dancing Bison Enterprises

Click here to get email about new products from Vasudev Ram.

Contact Page

Sunday, December 30, 2012

dtrx: Python tool to Do The Right eXtraction from archive files

dtrx: Intelligent archive extraction

Seen via this article, via Hacker News:

http://www.cyberciti.biz/open-source/best-terminal-applications-for-linux-unix-macosx/

dtrx looks useful.

Excerpt:

[
Features:

Handles many archive types : You only need to remember one simple command to extract tar, zip, cpio , deb, rpm, gem, 7z , cab, lzh, rar, gz , bz2 , lzma, xz , and many kinds of exe files, including Microsoft Cabinet archives, InstallShield archives, and self-extracting zip files. If they have any extra compression, like tar.bz2 files, dtrx will take care of that for you, too.

Keeps everything organized: dtrx will make sure that archives are extracted into their own dedicated directories.

Sane permissions : dtrx makes sure you can read and write all the files you just extracted, while leaving the rest of the permissions intact.

Recursive extraction : dtrx can find archives inside the archive and extract those too.
]

dtrx requires Python (>= 2.4, or 2.3 with the subprocess module), and the underlying tools that can extract each type of supported archive, such as unzip for .zip files.

- Vasudev Ram
www.dancingbison.com

Saturday, November 24, 2012

pinger utilities have multiple uses

Python | Host/Device Ping Utility for Windows

Saw the above pinger utility written by Corey Goldberg a while ago. It is in Python and is multi-threaded.

Seeing it reminded me of writing a pinger utility some years ago for a company I worked for at the time; it was for Unix systems, and was not multi-threaded.

It was written in a combination of Perl (for regex usage), shell and C.

The C part (a program that was called from the controlling shell script) was used to overcome an interesting issue: a kind of "drift" in the times at which the ping command would get invoked.

The users wanted it to run exactly on the minute, every n minutes, but it would sometimes run a few seconds later.

I used custom C code to solve the issue.

Later I learned (by reading more docs :) that the issue could probably have been solved by calling a Unix system call or two (like gettimeofday or getitimer, I forget exactly which right now) from my C program.

Anyway, the tool ended up being used to monitor the uptime of many Unix servers at the company. The sysadmins (who had asked me to create the tool) said that it was useful.

As Corey says in his post, pinger tools can be used to monitor network latency, check if hosts / devices are alive, and also to log and report on their uptime over an extended period, for reporting and for taking corrective action (as my utility was used).

Also check out pingdom.com for an example of a business built on these concepts. Site24x7.com is another such business; it is part of the same company as Zoho.com. They were (and still are)  into network monitoring / management before they created the Zoho suite of web apps.

I use both Pingdom and Site24x7 on my business web site www.dancingbison.com, from over a year or more now, to monitor its uptime, and both are fairly good at that.